Showing posts with label sewing. Show all posts

Feb 13, 2015

The Skirt

Happy Friday y'all! With over 100 page views, more than any other blog post, my tutorial of the Simplicity 4236 is the most viewed tutorial on my blog. Who knew that when I posted it over two and a half years ago people would enjoy it so much? Well, maybe I did.

I love the pattern because it is so easy to whip up on a weekend or a long afternoon. I have made over half a dozen skirts with this pattern. It has a very flattering style to it. Plus, when you are making your own clothes, you can design it in any way that you want. Add ruffles, a contrasting bias tape, the list is almost endless. I love taking one pattern and changing it to suit my tastes for the season. changing the length or pattern of material makes two skirts of the same pattern look very different. Who doesn't want to get complements on their outfit only to reply that they made it themselves? I have decided to show you some of the other skirts I have made with this pattern. And believe me, these aren't all of the ones I have made throughout the years. The original tutorial can be found here.


 This is one of the last ones that I made. I love that floral pattern! Plus the color scheme matches green, black, gray, white, cream, and tan! This is my go-to year-round skirt.


 And this is the very first skirt I made with this pattern (well, really the first full sized skirt that I ever made. And the first project that I used a sewing pattern for). I have had it for many years. As you can see the zipper is a little wonky and the waistband is starting to fall apart, but I can't stop wearing it. : )  I just love the color and polka-dots are always a winner.


Fly with Christ!
Rachel : )

Jan 29, 2013

How to Attach a Zipper

O.K. y'all! I didn't explain how I attach a zipper in my skirt tutorial, hence the reason for this post. So here goes!
WARNING: These instructions were created by a self taught seamstress. They are not perfect by any means.
Supplies: Zipper (in correct size), pins, contrasting thread, and an item longing to have a zipper. : )
Pin your zipper into place. This may take a few tries, but an even zipper is worth it. I like to line up my material to the edge of the zipper.
Baste the zipper into place by stitching where the pins were with a straight seem. THIS DOES NOT NEED TO BE PERFECT! The stitches don't need to be too small or they will be hard to pull out later. They also don't need to be too big or your zipper will slide around.
If you have a zipper presser foot, attach it to your machine now.
Start at the top of the zipper, it is best to have it unzipped, backstitch, and continue on down the edge.
When you get to the bottom, lower the needle into the material, lift up the presser foot, and make a 90 degree turn, keeping the zipper to the right of the presser foot. Lower the presser foot and stitch along the bottom of the zipper.
Again, lower the needle, raise the presser foot and make another 90 degree angle. Stitch along the edge until the end, backstitch and trim the strings.
Now we need to remove the basting thread.
Simply pull the basting thread out.
This is what it should look like.
And then you're done! Don't forget to iron it when you are done. Just remember to take your time and practice makes perfect!


Fly with Christ!
Rachel : )

Jan 15, 2013

More Patches

Here are some of the newest patches that I have finished for my quilt!


Fly with Christ!
Rachel : )

Jan 1, 2013

Happy New Year!

I hope that everyone stayed safe and had a grand time last night. We didn't go anywhere due to sickness, but we tried to make the most of it by watching movies and eating chips and salsa all night.

Anyway...This past weekend I went to Hancock Fabrics to purchase some new material and notions. They have some great sales going on right now ($2 per yard for solid cotton!). So I decided to make a vintage dress! I didn't take any pictures during the process with this project unlike my other tutorials.

This was the first time I have ever made a dress for myself. It was also the first time I had ever made sleeves for a real sized project. Tell me what y'all think!

 This is the material and notions that I got on sale. I got this vintage pattern from my grandmother. : )  I don't know what I am going to do with the green material yet. I might just make another dress!

And here it is...

Eleanor had to try the dress on herself.
May God bless each and every one of you in this new year!


Fly with Christ!
Rachel : )

Sep 5, 2012

Vintage Children's Patterns

Here are some of my vintage children's patterns.

Simplicity 6867 (1975)

McCall's 3496 (1973)

Simplicity 7186 (1967)

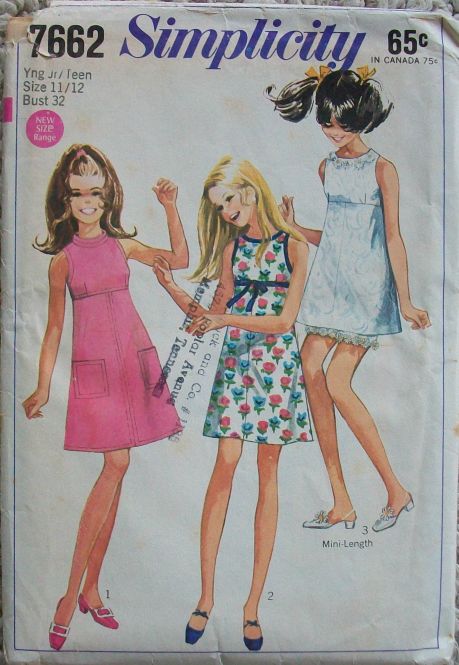
Simplicity 7662 (1968)
I made this one for Eleanor last Easter. Don't worry, the dress is much longer than it looks! : )


Fly with Christ!
Rachel : )

Aug 13, 2012

Vintage Patterns

Today I will let you have a peak at my vintage sewing pattern stash. Enjoy!

Simplicity 5107 (1960's)

Simplicity 2651 (1950-60's)

Simplicity 7931 (1977)

Simplicity 5927 (1965)


God bless!
Rachel : )

Jul 13, 2012

Simplicity 4236

Let me start out by saying this is one of my favorite sewing patterns, ever. I have made this skirt many, many times. I use view B. By the way, I don't follow the instructions exactly, which is really no surprise for those who know me.

Supplies:
Simplicity pattern 4236
Material
A Hook and Eye closure
Matching thread, zipper, and bias tape.
Sewing machine(This is probably one of those "duh" things unless you plan on conquering this project by hand.)


Start out by purchasing, washing, drying, and ironing your material. Fold your material with the right sides facing each other.


Position and pin your pattern like I did. The fold of my material is on the right side.

I like to add about 4 inches to this skirt. You can do this by lining up your ruler/tape measure and pinning the length all the way around the skirt bottom.

Cut out the skirt. Don't forget your darts! : )

This is what my skirt looked like after cutting.

Remove the pattern, and pin the sides together. (The material is already right sides together so you don't have to move it around. All you have to do is pin it!) Starting at the top of one side, stitch about 1/2 in., backstitch, and continue stitching down the length of the skirt, removing pins as you go. Backstitching will keep you from having to tie your threads. Backstitch at the other end.

Iron the seam flat.

Repeat with the other side, except start at the bottom of the skirt and make your way to the dart. Backstitch at the dart and iron seams flat.

Baste your zipper into place and then machine stitch it. Remove your basting thread.

Take your extra wide double fold bias tape(1/2 in.)...
Unfold it once ...
Flip out one side...
And gently press.

Take the open side and pin the edge to the waist edge all the way around the skirt.

Position your needle so that your stitches are in the crease. Backstitch and then stitch along the waistline, ending with backstitching.

Take your bias tape and...

Fold over the top edge of the skirt and pin. You want your pins to be right under the bias tape in the front.

But catch the bias tape in the back, which is where you want your stitches to be.


Backstitch at both ends and keep your stitches under the bias tape, creating a finished look.

Attach a hook and eye closure.

Allow to hang overnight. After that, all you have to do is put in a hem and your skirt is done!

For the hem, fold the bottom edge up about a half inch and press.


Fold it up one more time, press and pin it to create a finished hem.

Stitch along the hem removing pins as you go. I like to line my hem up with my presser foot to get a straight line.

Backstitch and trim your threads after you go all the way around.

And you're done! Now you are ready to show the world your awesome sewing skills. (Don't forget to remember me when you become a rich and famous seamstress/fashion designer up in New York!)


God bless!
Rachel : )